Resolution vs. Pixel Density in Displays

Motivation:

Which display should you choose when buying a TV or laptop or mobile device, bigger size or bigger resolution?

Terminologies:

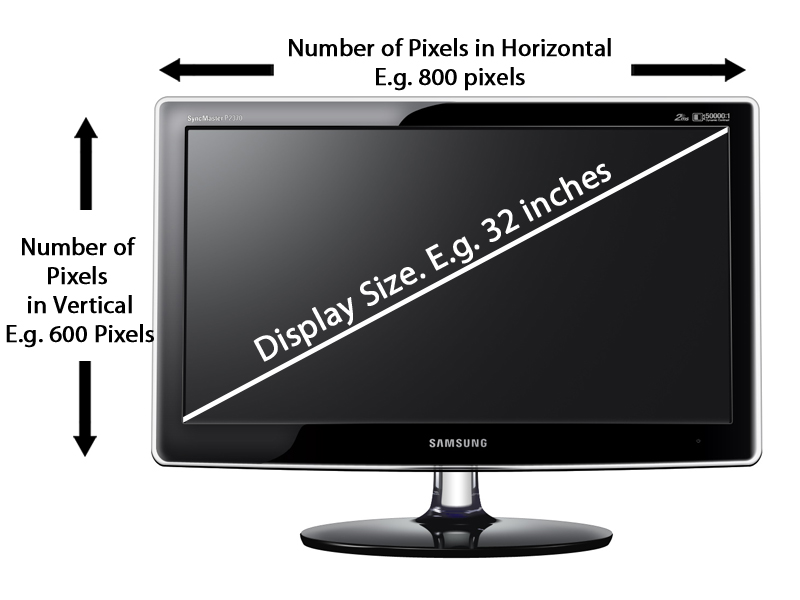
Size Display size is measured in inches. Here we only measure the diagonal size in inches and not the horizontal or vertical size of the screen.

Square the horizontal or vertical size of the screen in inches, and add the two numbers together. Find the root of that resulting number, and you have your display's diagonal in inches.

Pixel It is the smallest element that can be displayed on a screen. To be more simple, it is just a single dot on a display or a screen.

Resolution Resolution refers to size of the display in terms of pixels. E.g. Resolution of 800×600 pixels means that the there are 800 pixels horizontally and 600 pixels vertically. So therefore there are a total of 480000 pixel in the display.

Square the display's width and height in pixels, and add the two numbers together. Find the root of that resulting number, and you have your display's diagonal resolution in pixels.

Pixel Density Many of us are not aware of the importance of Pixel Density in displays. It is the thing which describes the sharpness and clarity.

Pixel Density is usually measured in PPI (Pixels Per Inch) which refers to number of pixels present per inch on the display. Higher the pixel density higher is the sharpness of the content.

Pixel Density is calculated based on the resolution and size of the display.

Pixel Density = Diagonal resolution in pixels/Diagonal in inches

Consider the above image. The alphabet “A” on the left is displayed on screen (32 inch display size) with lower resolution. The alphabet “A” on the right is displayed on the screen (32 inch display size) with higher resolution which delivers better sharpness.

What does this mean?

The thing with PPI is that with the same resolution, the larger the screen, the lower the PPI, the lower sharpness. This is because a larger screen means the individual pixels have to be larger to fill the space.

If you compare iPhone 6s Plus and Samsung Galaxy S7 Edge which both have the same size 5.5 inch but iPhone 6s Plus comes with 1920×1080 resolution at 401 PPI while Galaxy S7 Edge comes with  a 2560×1440-pixel resolution at 534 PPI. It means the text and images on the Galaxy S7 Edge’s display are sharper than on the iPhone 6s Plus’ display.

The interesting thing about devices that boast a higher PPI that 400 is that your eyes can’t see the high concentration of pixels at normal smartphone viewing distances. Your naked eye can only see densities of up to 399, so you won’t be able to tell the difference between a device with a PPI of 400 and 440 (the Samsung Galaxy S7 Edge, for example).

Some examples:

  • Dell XPS 13 (2016) has a pixel density of 276.
  • Dell Precision 5510 Workstation 15 (2016) has a pixel density of 282.
  • MacBook Pro 13-inch (2016) has a pixel density of 227.
  • MacBook Pro 15-inch (2016) has a pixel density of 220.

How to Use Let’s Encrypt

Motivation:

Why use an SSL/TLS certificate to secure your website?

– To protect your website users from man-in-the-middle attacks.

– To ensure the integrity of the data being sent to your website.

Why use Let’s Encrypt SSL/TLS certificate?

– Because it is FREE.

Tested environment:

  1. Windows Server 2016/IIS 10
  2. win-acme.v2.2.9.1701.x64.pluggable
  3. Ubuntu 18.04
  4. certbot 0.27.0

On Windows and IIS:

  1. If you are using a cloud provider then ensure that HTTP and HTTPS service are enabled on cloud firewall.
  2. Log in a Windows server.
  3. Download
  4. win-acme.v2.2.9.1701.x64.pluggable.zip
  5. on https://github.com/win-acme/win-acme/releases.
  6. Unzip the files to C:\inetpub\win-acme.v2.2.9.1701.x64.pluggable
  7. Open Command Prompt (Admin) and execute below commands.
    cd C:\inetpub\win-acme.v2.2.9.1701.x64.pluggable
  8. Type wacs.exe and press Enter
  9. Follow the instructions.
  10. Open Task Scheduler and ensure that a task with description “Check for renewal of ACME certificates.” has been created.
  11. Open Firewall port 443 if needed.
  12. Open the selected website using HTTPS protocol.
  13. Update emails to which notifications will be sent: Open wacs.exe, type O, then A, then y, and enter an email.
  14. Remove website from automatic renewal:
    wacs.exe --list // Copy the exact name between ": " and " - renewed" without quotes. // Example: [IISBinding] huybien.com 
    wacs.exe --cancel --friendlyname "[IISBinding] huybien.com"

Upgrading win-acme

  1. Go to the old version folder, type wacs, press a, press c to cancel renewal.
  2. Download and extract new version.
  3. Go to the new version folder, type wacs, press N to create new certificates, and select option to replace the existing scheduled task.
  4. Delete the old version folder.

Redirecting HTTP to HTTPS in IIS7

  1. Install the Microsoft URL Rewrite Module if needed.
  2. Make sure Require SSL is NOT checked under SSL Settings for your website.
  3. Copy and paste the following code between the <rules> and </rules> tags in your web.config file in your website root directory.
    <rule name="HTTP to HTTPS redirect" stopProcessing="true">
       <match url="(.*)" />
          <conditions>
             <add input="{HTTPS}" pattern="off" ignoreCase="true" />
          </conditions>
       <action type="Redirect" redirectType="Found" url="https://{HTTP_HOST}/{R:1}" />
    </rule>
  4. Open your site using HTTP protocol and ensure that you are redirected to the HTTPS site.

Multiple SSL Certificates per IP Address

  1. You have to use Server 2012 IIS to support Server Name Indication (SNI) which allows you to bind multiple SSL certificates to a single IP Address.
  2. Please repeat the Procedure for each site, then go to the IIS site, Bindings and ensure that the check box Require Server Name Indication is selected and the corresponding SSL Certificate is selected.
  3. Please be noted that SNI does not work with Windows XP clients.

On Ubuntu and nginx

  1. Login as root via SSH to a Ubuntu server.
  2. Execute 3 commands below.
sudo apt install python-certbot-nginx
sudo certbot --nginx -d huybien.com -d www.huybien.com -d example.com -d www.example.com 
sudo certbot renew --dry-run

3. Remove a certificate:

sudo certbot delete

4. Update emails to which notifications will be sent:

sudo certbot register --update-registration --email [email protected]

5. Review Let’s Encrypt’s log file:

sudo nano /var/log/letsencrypt/letsencrypt.log
# Press Ctrl+W, then enter a string to be found.
# Press Alt+W to find a next match.