All posts by admin

How to find a string in files

Motivation:

Find a string in all files in a directory without having to install an external program that may decrease system security.

Method 1:

  1. Open a command prompt (cmd.exe)
  2. Go to the directory and
  3. Execute below command:
find /i "search string" *.*

/i: ignores the case of your search string.

Examples:

find /i "app files were copied" *.*
find /i "were copied" *.log

Method 2:

  1. Open a command prompt (cmd.exe)
  2. Go to the directory and
  3. Execute below command:
findstr /s "search string" *.*

/s: searches for each word in your search string.

or execute below command:

findstr /C:"search string" *.*

/C: searches for exact match of your search string .

Examples:

findstr /s "Integrated Security=true" *.cs
findstr /C:"app files were copied" *.log

Quick Format vs. Full Format

Question:

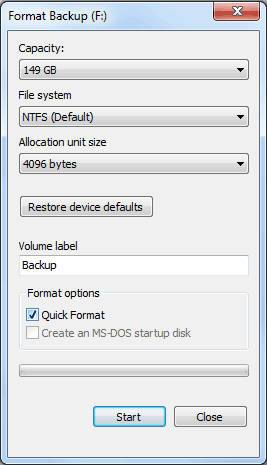
What is the difference between Quick Format and Full Format?

Which option should you choose when formatting a drive?
Answer:

When you choose to run a Full Format on a volume (or partition), files are removed from the volume that you are formatting and the hard disk is scanned for bad sectors. The scan for bad sectors is responsible for the majority of the time that it takes to format a volume.

When you choose to run a Quick Format on a volume (or partition), format removes files from the partition, but does not scan the disk for bad sectors. Only use this option if your hard disk has been previously formatted and you are sure that your hard disk is not damaged.


Question:

What is the difference between MBR disk and GPT disk?

Which option should you choose when initializing a new external drive?

Answer:

MBR (Master Boot Record) disk allows you to install older operating systems. However it can only recognize up to 2TB space, and allows you to create up to 4 partitions.

GPT (GUID Partition Table) disk does not allow you to install older operating systems. However it can recognize more than 2TB space, and allows you to create more than 4 partitions.

When initializing a new external drive, probably you should initialize your disk as a GPT disk unless you want to install an old operating system on your external disk.

If you need to convert a disk to GPT while installing Windows then you can press Shift + F10 or Fn + Shift + F10 to open Command Prompt when you arrive the Windows Edition Selection screen. Then follow the procedure below.

Enter diskpart.exe, press Enter.
DISKPART> list disk
DISKPART> select disk 0 -- the disk should be selected, the number may be different in your machine.
DISKPART> clean
DISKPART> convert gpt
DISKPART> exit

In order to detect hard drive model, serial number and size use the command below.

wmic diskdrive get model, serialNumber, size


Problem:

How to solve Windows Server 2012 (R2) Extend Volume Greyed Out issue?

You are trying to extend partition with Disk Management snap-in Windows Server 2012 (R2), but you find the option to Extend Volume greyed out.
Solution:

Reason 1: The cause is disk partition style. Your disk partition is MBR style that supports only up to 2TB.

Solution for reason 1: Convert MBR to GPT disk for using un-allocated space beyond 2TB.

Reason 2: The un-allocated space is not contiguously behind the target partition that you want to extend.

Solution 1 for reason 2:

Step 1: Backup the partition (e.g. D:) behind the target drive (e.g. C:) you want to extend. Right-click on the D: partition and select "Delete Volume" in the drop down list.

Step 2: Once you have D: partition delete, it will turn into an unallocated space and be automatically merged with other unallocated space that is next to it if have. Now you can right-click on C: drive and "Extend Volume" option is available.
Solution 2 for reason 2:

Use a third-party application to merge the partitions, e.g. AOMEI Partition Assistant Server Edition.
 

Talking about your job

What do you do for a living?

I'm a teacher.
I'm a doctor.
I'm a writer.
I work in IT.
I work in television.
I work with cancer patients.
I work in education.
I work as a salesman.
I work in advertising.
I work as a mechanic.
I work with special children.
I am not employed. I stay at home and look after the children.
I'm a stay-at-home mother.
I'm a housewife.
I don't work

Where do you work?

I work in a university.
I work in a college.
I work in an office.
I work in a bank.
I work in a shop.
I work in a factory.
I work in a pub.
I work on a farm.
I work at home.

Who do you work for?

I work for a US company.
I work for a multinational company.
I work for a publishing company.
I'm self-employed.
I work for myself.
I run my own business.

Talking about your apartment

Some useful words:

  • Roof
  • Top floor
  • The upper floors (in relation to your floor or some cutoff line)
  • Your floor
  • The lower floors (in relation to yours)
  • Bottom floor (could be street level, ground level, or ground floor)
  • Basement

Examples:

  • I live on the second floor and he on the third floor. He lives on the floor above mine.
  • I live on the second floor and he on the first. He lives on the floor below mine.

Exemplification:

My building has 18 floors and I live on the ninth floor. Mr Smith lives on the 18th, the top floor. Mr Jones lives in the upper floors on the 15th. Mrs Jackson and her kids live in the lower floors on the third. The bottom floor at street level is where the building manager lives. The basement is where the water boilers and the washing machines are located.

Source: https://www.quora.com

Resolution vs. Pixel Density in Displays

Motivation:

Which display should you choose when buying a TV or laptop or mobile device, bigger size or bigger resolution?

Terminologies:

Size Display size is measured in inches. Here we only measure the diagonal size in inches and not the horizontal or vertical size of the screen.

Square the horizontal or vertical size of the screen in inches, and add the two numbers together. Find the root of that resulting number, and you have your display's diagonal in inches.

Pixel It is the smallest element that can be displayed on a screen. To be more simple, it is just a single dot on a display or a screen.

Resolution Resolution refers to size of the display in terms of pixels. E.g. Resolution of 800×600 pixels means that the there are 800 pixels horizontally and 600 pixels vertically. So therefore there are a total of 480000 pixel in the display.

Square the display's width and height in pixels, and add the two numbers together. Find the root of that resulting number, and you have your display's diagonal resolution in pixels.

Pixel Density Many of us are not aware of the importance of Pixel Density in displays. It is the thing which describes the sharpness and clarity.

Pixel Density is usually measured in PPI (Pixels Per Inch) which refers to number of pixels present per inch on the display. Higher the pixel density higher is the sharpness of the content.

Pixel Density is calculated based on the resolution and size of the display.

Pixel Density = Diagonal resolution in pixels/Diagonal in inches

Consider the above image. The alphabet “A” on the left is displayed on screen (32 inch display size) with lower resolution. The alphabet “A” on the right is displayed on the screen (32 inch display size) with higher resolution which delivers better sharpness.

What does this mean?

The thing with PPI is that with the same resolution, the larger the screen, the lower the PPI, the lower sharpness. This is because a larger screen means the individual pixels have to be larger to fill the space.

If you compare iPhone 6s Plus and Samsung Galaxy S7 Edge which both have the same size 5.5 inch but iPhone 6s Plus comes with 1920×1080 resolution at 401 PPI while Galaxy S7 Edge comes with  a 2560×1440-pixel resolution at 534 PPI. It means the text and images on the Galaxy S7 Edge’s display are sharper than on the iPhone 6s Plus’ display.

The interesting thing about devices that boast a higher PPI that 400 is that your eyes can’t see the high concentration of pixels at normal smartphone viewing distances. Your naked eye can only see densities of up to 399, so you won’t be able to tell the difference between a device with a PPI of 400 and 440 (the Samsung Galaxy S7 Edge, for example).

Some examples:

  • Dell XPS 13 (2016) has a pixel density of 276.
  • Dell Precision 5510 Workstation 15 (2016) has a pixel density of 282.
  • MacBook Pro 13-inch (2016) has a pixel density of 227.
  • MacBook Pro 15-inch (2016) has a pixel density of 220.

How to Use Let’s Encrypt

Motivation:

Why use an SSL/TLS certificate to secure your website?

– To protect your website users from man-in-the-middle attacks.

– To ensure the integrity of the data being sent to your website.

Why use Let’s Encrypt SSL/TLS certificate?

– Because it is FREE.

Tested environment:

  1. Windows Server 2016/IIS 10
  2. win-acme.v2.2.9.1701.x64.pluggable
  3. Ubuntu 18.04
  4. certbot 0.27.0

On Windows and IIS:

  1. If you are using a cloud provider then ensure that HTTP and HTTPS service are enabled on cloud firewall.
  2. Log in a Windows server.
  3. Download
  4. win-acme.v2.2.9.1701.x64.pluggable.zip
  5. on https://github.com/win-acme/win-acme/releases.
  6. Unzip the files to C:\inetpub\win-acme.v2.2.9.1701.x64.pluggable
  7. Open Command Prompt (Admin) and execute below commands.
    cd C:\inetpub\win-acme.v2.2.9.1701.x64.pluggable
  8. Type wacs.exe and press Enter
  9. Follow the instructions.
  10. Open Task Scheduler and ensure that a task with description “Check for renewal of ACME certificates.” has been created.
  11. Open Firewall port 443 if needed.
  12. Open the selected website using HTTPS protocol.
  13. Update emails to which notifications will be sent: Open wacs.exe, type O, then A, then y, and enter an email.
  14. Remove website from automatic renewal:
    wacs.exe --list // Copy the exact name between ": " and " - renewed" without quotes. // Example: [IISBinding] huybien.com 
    wacs.exe --cancel --friendlyname "[IISBinding] huybien.com"

Upgrading win-acme

  1. Go to the old version folder, type wacs, press a, press c to cancel renewal.
  2. Download and extract new version.
  3. Go to the new version folder, type wacs, press N to create new certificates, and select option to replace the existing scheduled task.
  4. Delete the old version folder.

Redirecting HTTP to HTTPS in IIS7

  1. Install the Microsoft URL Rewrite Module if needed.
  2. Make sure Require SSL is NOT checked under SSL Settings for your website.
  3. Copy and paste the following code between the <rules> and </rules> tags in your web.config file in your website root directory.
    <rule name="HTTP to HTTPS redirect" stopProcessing="true">
       <match url="(.*)" />
          <conditions>
             <add input="{HTTPS}" pattern="off" ignoreCase="true" />
          </conditions>
       <action type="Redirect" redirectType="Found" url="https://{HTTP_HOST}/{R:1}" />
    </rule>
  4. Open your site using HTTP protocol and ensure that you are redirected to the HTTPS site.

Multiple SSL Certificates per IP Address

  1. You have to use Server 2012 IIS to support Server Name Indication (SNI) which allows you to bind multiple SSL certificates to a single IP Address.
  2. Please repeat the Procedure for each site, then go to the IIS site, Bindings and ensure that the check box Require Server Name Indication is selected and the corresponding SSL Certificate is selected.
  3. Please be noted that SNI does not work with Windows XP clients.

On Ubuntu and nginx

  1. Login as root via SSH to a Ubuntu server.
  2. Execute 3 commands below.
sudo apt install python-certbot-nginx
sudo certbot --nginx -d huybien.com -d www.huybien.com -d example.com -d www.example.com 
sudo certbot renew --dry-run

3. Remove a certificate:

sudo certbot delete

4. Update emails to which notifications will be sent:

sudo certbot register --update-registration --email [email protected]

5. Review Let’s Encrypt’s log file:

sudo nano /var/log/letsencrypt/letsencrypt.log
# Press Ctrl+W, then enter a string to be found.
# Press Alt+W to find a next match.


Wait and Await

The verbs wait and await have similar meanings but they are used in different grammatical structures.

The verb await must have an expressed object.

  • I am awaiting your reply.
  • They are awaiting the birth of their first baby.

The object of await is usually a thing. It is not a person.

For example, we can’t say: I am awaiting you.

The verb wait can be used in several different structures.

Wait does not require an object.

  • We have been waiting for hours.

Wait can be followed by an infinitive.

  • I waited in line to board the bus.
  • I am waiting to hear from him.

When we use the verb ‘wait’, we usually also mention the length of the time we have been waiting.

  • I have been waiting since morning.

Before an object, wait takes the preposition for. Note that in this case, the noun/pronoun that follows for is the object of the preposition.

  • I am waiting for you. (NOT I am waiting you.)
  • We are waiting for his call. OR We are awaiting his call.

Await is more formal than wait for. It can be used in formal letters and documents.

Wait is more common and leaves less room for confusion.

Note that await does not take the preposition ‘for’.

  • We are awaiting his call. (NOT We are awaiting for his call.)

Complete the following sentences using wait or await.

1. Let’s ………………. until he arrives. (wait / await)

2. The manager is busy now, so you will have to ……………….. (wait / wait for / await)

3. I have been …………………. a bus for two hours. (waiting for / awaiting / waiting)

4. The bill is ………………….. parliamentary approval. (awaiting / waiting)

Answers

1. wait; 2. wait; 3. waiting for; awaiting

Source: www.englishgrammar.org

How to completely uninstall Android Studio in macOS?

Problem:

You have an issue with Android Studio and want to reinstall it. In order to reinstall a fresh instance you need to uninstall the current version first.

Solution:

Execute these commands from the terminal:

rm -Rf /Applications/Android\ Studio.app
rm -Rf ~/Library/Preferences/AndroidStudio*
rm ~/Library/Preferences/com.google.android.studio.plist
rm -Rf ~/Library/Application\ Support/AndroidStudio*
rm -Rf ~/Library/Logs/AndroidStudio*
rm -Rf ~/Library/Caches/AndroidStudio*
rm -Rf ~/.AndroidStudio*

if you would like to delete all projects:

rm -Rf ~/AndroidStudioProjects

to remove gradle related files (caches & wrapper)

rm -Rf ~/.gradle

use the below command to delete all Android Virtual Devices(AVDs) and *.keystore. note: this folder is used by others Android IDE as well, so if you still using other IDE you may not want to delete this folder)

rm -Rf ~/.android

to delete Android SDK tools

rm -Rf ~/Library/Android*

Source: http://stackoverflow.com

How do we make an image look darker using Photoshop?

How do we make an image look darker using Photoshop?

  • Use Ctrl+J to duplicate the image layer
  • Click on the top layer and change the blend mode to either Multiply or Overlay
  • Go to Image > Adjustments > Levels
  • Adjust the middle node (sliding right makes darker image, sliding left makes lighter image) till you get your desired outcome.

How do we change a layer’s opacity?

  • Right click a layer > Blending Options…
  • Change the Opacity value

How do we straighten a photo (transform perspective while cropping)?

  • Hold down the Crop tool and select the Perspective Crop tool
  • Draw a marquee around the distorted object. Match the edges of the marquee to the rectangular edges of the object.
  • Press Enter (Windows) or Return (Mac OS) to complete the perspective crop.

How do we crop a photo with 4×6 ratio?

  • Hold down the Crop tool and select the 2:3 (4:6) from the drop down box on the top panel.
  • Resize the grid to appropriate size.
  • Right click on the image and select Crop.

How do we horizontally straighten a photo?

  • Hold down the Ruler tool and draw a line as the new horizontal.
  • Click Straighten Layer on the top panel.


How to Transfer Files and Music to an Android Phone Using USB

So you’ve plugged your USB to microUSB cable into your computer and Android phone and are ready to start downloading files.

Staring intently at your screen, you wait for a drive, a window — something, anything — where you can drag-and-drop your files, but it just doesn’t come.

Well, chances are, you are missing one simple yet critical but step.

Here’s how to transfer files to your Android phone:

  1. Connect your Android phone to your computer using the microUSB to USB cable.
  2. If you are using a PC, you will see an installation bubble pop up in the bottom right of your screen. Wait for the computer to successfully complete installation.
  3. The critical step: On your Android phone, pull down the notification window (aka ‘window shade’) and tap USB connected.
  4. A notification window will appear. Tap Mount. Your phone will enter USB storage mode.
  5. Find the removable storage drive. On a PC, navigate to My Computer and look for a new removable storage drive. On a Mac, the drive will appear on your desktop.
  6. Drag-and-drop the desired file(s) to the drive.
  7. In your phone’s notification window, tap Turn off USB storage.
  8. Unplug your phone and you’re all set.

Source: https://www.wirefly.com/