How to Backup and Restore an EC2 Instance

Motivation:

Any changes related to an operating system or an application in an EC2 instance may break its connection. You may try to stop, start, or reboot the instance many times but the problem may still persist. In this case, you may need to restore the instance to a previous stable version.

Viruses, malwares or accidental deletion of data may also require a restore of an instance to a previous stable version.

In order to restore an EC2 instance to a previous version you first need to create its backups either manually or automatically.

Manually backup an EC2 instance:
  1. Click Volumes on the left menu.
  2. Click a volume, click Actions, click Create Snapshot.
Manually restore an EC2 instance:
  1. Click Snapshots on the left menu, click a snapshot of an instance.
  2. Click Actions, click Create Volume.
  3. Let all default settings intact, click Create Volume.
  4. Repeat the first 3 steps for all the snapshots of the instance.
  5. Stop the instance.
  6. Click the instance, click Storage, scroll down and click on the link of /dev/sda1 device.
  7. Click Actions, click Detach Volume (or Force Detach Volume if the Detach Volume function does not work).
  8. Click Volumes on the left menu.
  9. Click on the volume created from the snapshot.
  10. Click Actions, click Attach Volume.
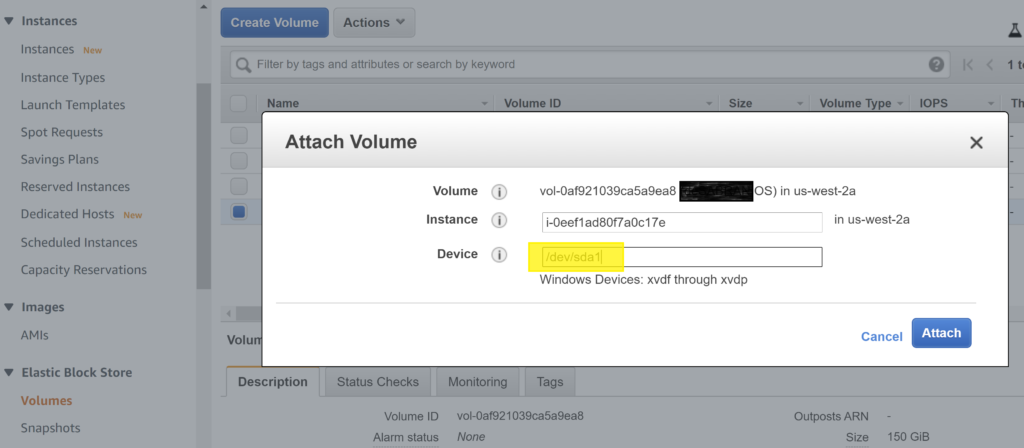
  11. Select the instance, set Device = /dev/sda1, click Attach.

12. Detach and attach the remaining volume to the instance.
13. Start the instance.

Automate backup process for an EC2 instance:
  1. Go to AWS Backup service.
  2. Click Backup plans on the left menu.
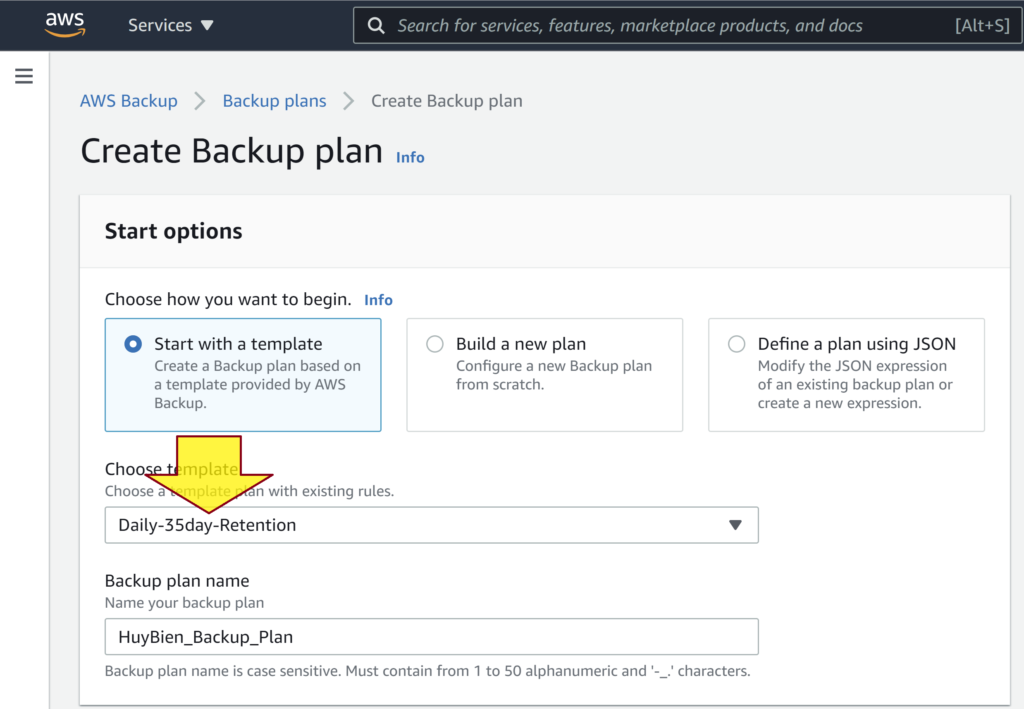
  3. Click the Create Backup plan button, select a template (e.g. Daily-35day-Retention), enter a backup plan name (e.g. HuyBien_Backup_Plan).

4. Click Backup plans on the left menu, click on a backup plan name.
5. Scroll down to the Resource assignments section, click the Assign resources button.
6. Enter a resource assignment name (e.g. HuyBien_Instances or HuyBien_Volumes), the scroll down to the Assign resources section.
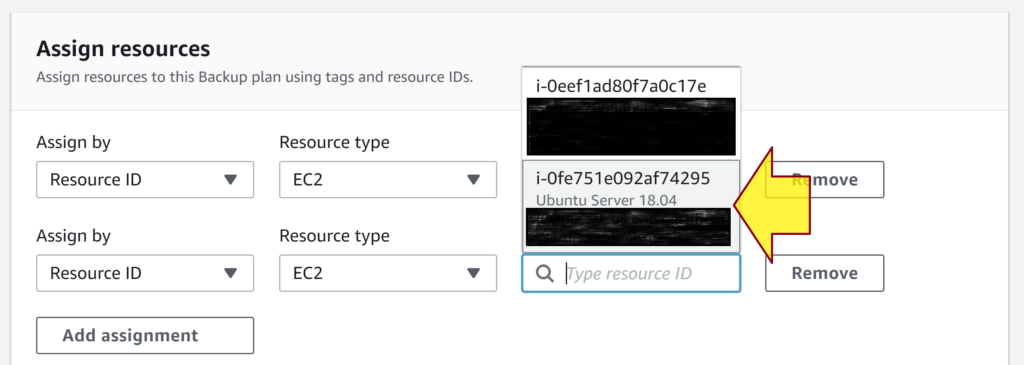
7. Select Resource ID for Assign by.

8. Select appropriate resources. When you select an EC2 instance, AWS Backup will create backup for all EBS volumes attached to the instance, and then will attach them to an AMI that stores all parameters from the original EC2 instance.
9. Click the Assign resources button.
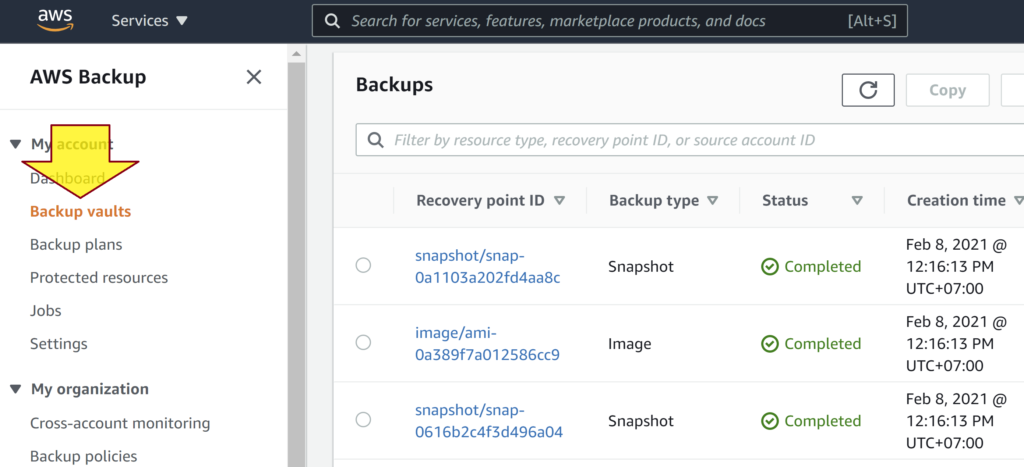
10. Wait for 1 day, then click on the Backup vaults link on the left menu, click a Backup vault name, scroll down to the Backup section to check for backups of the resources created by the backup plan execution.

Configure backup process time:
  1. Go to https://www.thetimezoneconverter.com/, and convert your time to UTC, for example 1:00 AM Saint Petersburg = 10:00 PM UTC.
  2. Go to AWS Backup, click Backup plans, click on a plan name.
  3. Scroll down to Backup rules, select a rule, click the Edit button.
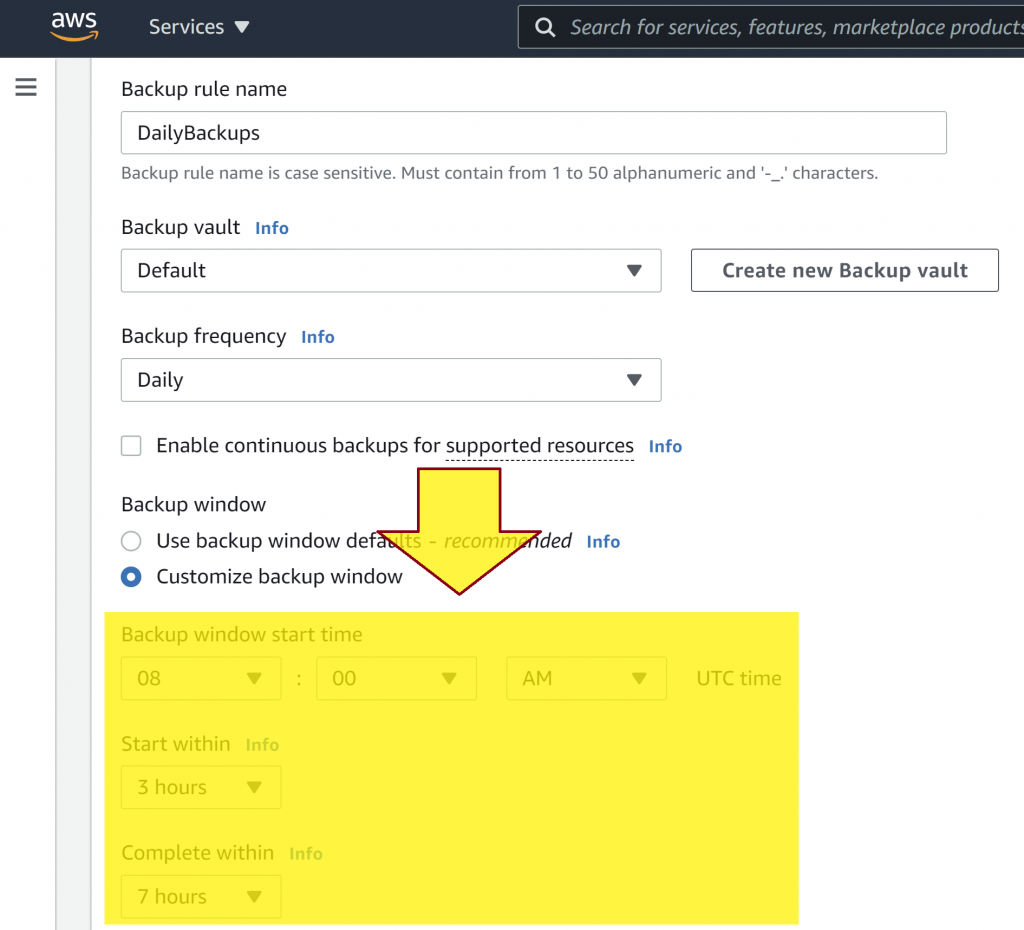
  4. Scroll down to Backup window, click Customize backup window and enter your times.
 

How to Fix iPhone Internet Connection Issue

Problem:

You iPhone can connect to a Wi-Fi router.
The Wi-Fi router does have an Internet connection. Other devices can connect to the Internet using this Wi-Fi router.
However you iPhone cannot connect to Internet.

Verification:
  1. Tap on Settings, then tap on Wi-Fi.
  2. Tap on the Wi-Fi network name.
  3. Scroll down to IPV4 ADDRESS section.
  4. Ensure that Configure IP = Automatic, IP Address = 169.X1.X2.X3 (X1, X2, X3 can be any number), Subnet Mask = 255.255.0.0, and Router may be empty.
Solution:
  1. Reboot the Router.
  2. If the problem still persists then please reset your iPhone by tapping on Settings > General > Reset > Reset All Settings.


How to Install Ubuntu and Windows as a Dual Boot

Motivation:

You are want to install Windows 10 and Ubuntu 18.04 (or Windows 11 and Ubuntu 22.04) as dual boot for completing some machine learning tasks.

Prerequisites:

You need to have a 8Gb USB stick.

Solution:

Step 1:

  • Note: You can skip this step if you are installing Windows 11 and Ubuntu 22.04.
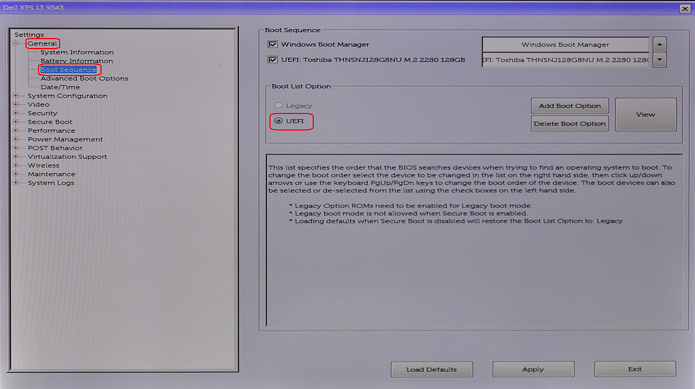
  • Go to BIOS, select the UEFI option in Boot List Option.
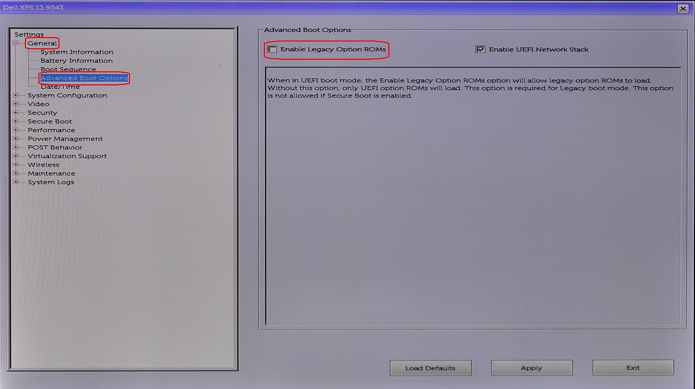
  • Disable the Enable Legacy option ROMS option.
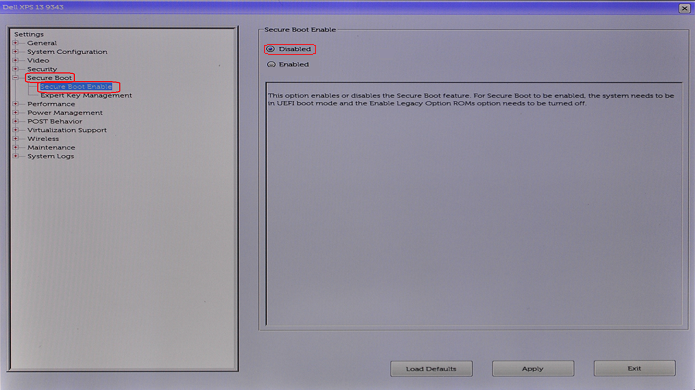
  • Disable Secure Boot.

Step 2:

  • Install Windows 10 or Windows 11.
  • Create a free partition for Ubuntu.

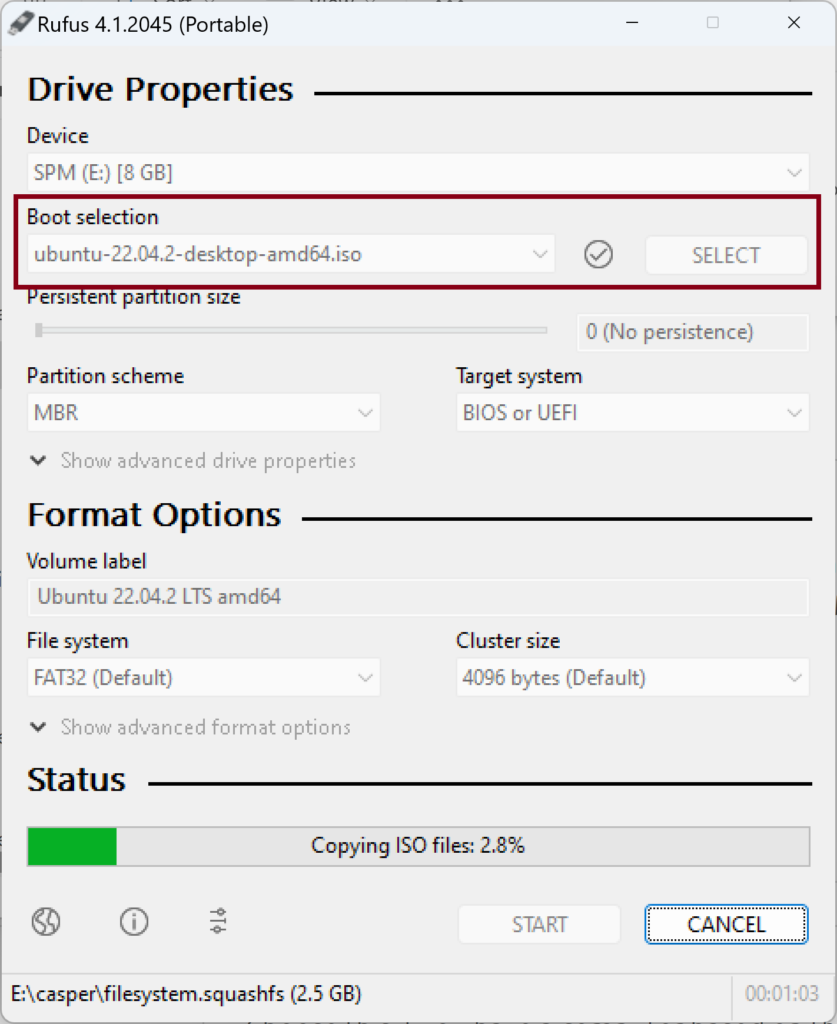
Step 3:

Step 4: Install Ubuntu.

  • Select Minimal installation option, Download updates while installing Ubuntu option on Updates and other software screen.
  • Select Install third-party software for graphics and Wi-Fi hardware option and enter a password on Updates and other software screen. This password will be used on first boot after install.
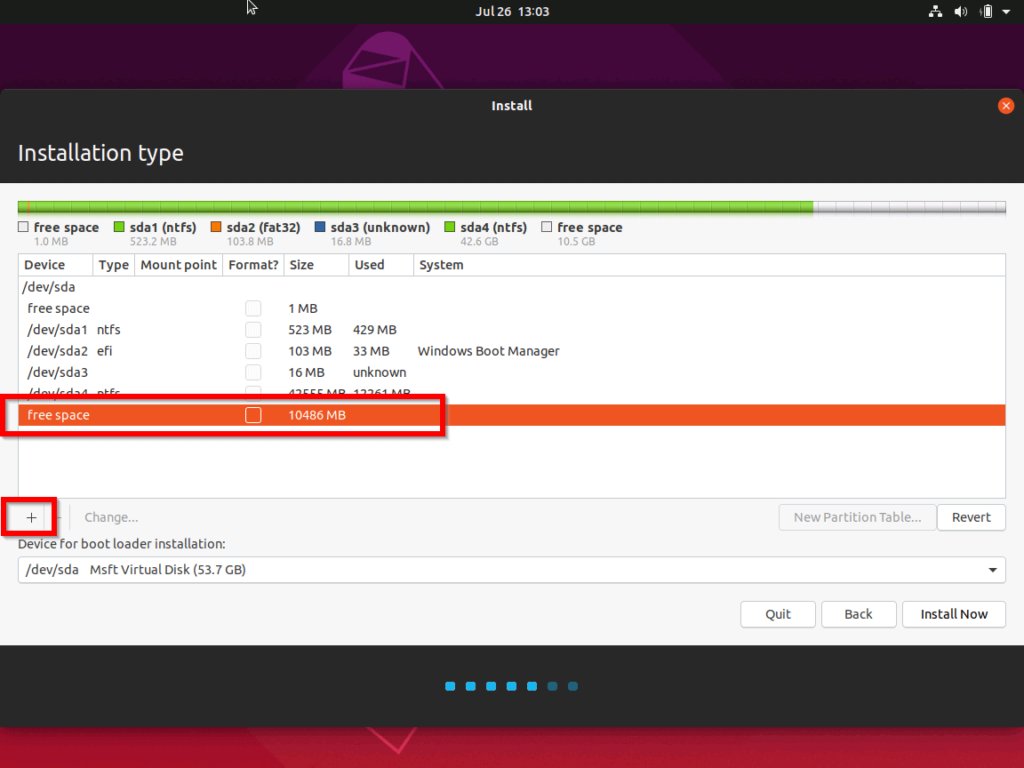
  • Select Something else on Installation type screen.
  • Select free space partition that you created for Ubuntu.
  • Click the + sign.

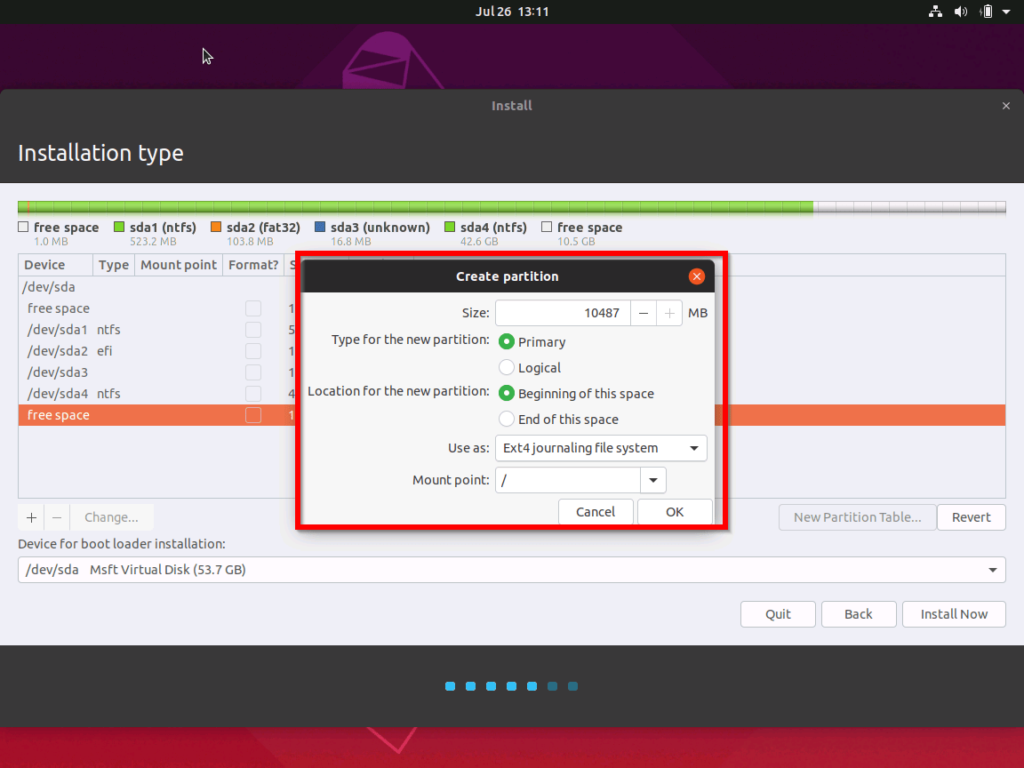
  • Create an EFI System Partition and set its size to be 552MB if it does not exist.
  • Create a swap area. Set its size to be twice as your RAM size, e.g. 65536Mb swap area for 32Gb RAM.
  • Create a Root partition. Set its size to be all the remaining free space to optimize your space.

  • Click Install Now button.
  • On first boot after install, select Enroll MOK.
  • Enter the password that you entered to install third party drivers.


How to Quickly Capture and Analyze Requirements for Building a Prototype or Proof of Concept?

Motivation:

You need to quickly capture and analyze requirements for building a prototype or proof of concept for an enterprise system.

Suggestion:
  1. Capture any artifacts related to a business need. They may be some emails, presentation slides, a proposal document, a legacy system, some similar systems, a feature list or an initial requirement specification.
  2. Define terminologies (terms), build a background and context around the terminologies, expand the terminologies into business roles, business workflows, business components, business entities (objects), and business artifacts as much as possible.
  3. Identify the main stakeholders (roles) who will interact with the system (e.g. Guest, Admin, Developer, User, etc.) and their corresponding business problems or needs (i.e. their motivation of using the software system), and their current business workflows. Create as many scenarios (real world or domain business workflows) as possible. Create a domain model (a model of real world or domain entities, their properties and their relationships) if necessary.
  4. If there is an existing or similar system then identify the core components that each stakeholder will interact with (e.g. Accounts, Profiles, Reporting, APIs, Lessons, Videos, etc.) and their corresponding purposes.
  5. Identify the main tasks that each stakeholder will perform (e.g. Register an Account, Log in System, Create/Edit Profile, Create a Bucket, Generate an API Key, Create/Edit/Delete a Lesson, Create/Edit/Delete a Video, View Bandwidth, etc.).
  6. Identify the inputs and outputs and create mock-ups (sketches) or capture similar screens for each task. The quickest way to create a mock-up is to find similar existing screens in your system or external systems, and modify them. You can also search for templates of similar features in the Internet, and modify them. You can also brainstorm a  new one if you are good at creativity and imagining.
  7. Build or draw a prototype demonstrating 2 or 3 critical end-to-end workflows (An end-to-end workflow is a sequence of tasks that solves a real world problem completely). Contrast a current business workflows with the end-to-end workflows demonstrated by the prototype. The quickest way to create a prototype is to find similar existing workflow of of your system or external systems, and modify them. You can also repurpose a business workflow for a prototype. You can also brainstorm a  new one if you are good at creativity and imagining.
  8. Implement a proof of concept related to the 2 or 3 critical end-to-end workflows.
  9. For a complicated system, you may need to implement a proof of concept, build a prototype, and create a work break down structure or product backlog in parallel to ensure that the requirements are technologically and economically feasible.


How to Convert M4A to WAV File on macOS

Motivation:

You have downloaded some M4A audio files.

You want to extract convert them to WAV files to listen to them in other devices that do not support playing M4A files.

Procedure:

  • In the Music app on your Mac, choose Music > Preferences, then click Files.
  • Copy the path of Music Media folder location. (An example path is Macintosh HD/Users/admin/Music/Music/Media.)
  • Click the Import Settings… button.
  • In the Import Using pop-up menu, set Import Using = Wav Encoder, then click OK to save the settings.
  • Drag M4A files to the Music app.
  • Select songs in your library, then click File > Convert > Create WAV Version.
  • Go to your library folder (i.e. the Music Media folder location) and copy the WAV files to other devices.
  • Delete the M4A files from your library.