Category Archives: Operating Systems

How to Block Your Child from Certain Websites

Motivation:

You have a child and do not want him to be able to install games from Microsoft Store or play online games on certain websites or run a specific program.

Solution:

I. Prevent your child from installing games Microsoft Store.
This method only applies to Windows 10 Enterprise and Windows 10 Education.

  1. Type gpedit in the search bar to find and start Group Policy Editor.
  2. In the console tree of the snap-in, click Computer Configuration, click Administrative Templates, click Windows Components, and then click Store.
  3. In the Setting pane, click Turn off the Store application, and then click Edit policy setting.
  4. On the Turn off the Store application setting page, click Enabled, and then click OK.

Note: Enabling Turn off the Store application policy turns off app updates from Microsoft Store.

Source: https://docs.microsoft.com/en-us/windows/configuration/stop-employees-from-using-microsoft-store

II. Block all websites except some websites using one of the software below.

  1. Surfblocker.

III. Block certain websites in your modem settings in order to prevent your child from playing online games on these websites.

If you are using FTP GPON Modem then you can

  1. Click on the Access tab on the top,
  2. Click on the Filter tab on the left,
  3. Select URL Filter as Filter Type Selection,
  4. Select 1 as URL Index,
  5. Enter URL (host) (e.g. bluestacks.com or roblox.com),
  6. Select Enabled as Individual active,
  7. Click on the Save button.
  8. Repeat the procedure for other hosts with other URL Indexes (i.e. 2, 3, 4, etc.).

    IV. Block all Windows users from running certain programs.

    1. Type gpedit.msc in search box, then press Enter.
    2. Expand User Configuration > Administrative Templates, then select System.
    3. Double click the policy Don’t run specified Windows applications.
    4. Set the policy to Enabled, then select Show.
    5. Add the programs you would like to prevent the user from running to the List of disallowed applications. Use the name of the application launching file such as chrome.exe.
    6. Restart your computer.


    Why Can’t You Install Windows 11 on Your Laptop?

    Issue:

    You have a laptop.
    You want to install Windows 11 on the laptop.
    However you got an unexpected error saying that you should visit https://aka.ms/WindowsSysReq for detail.
    You visited the page but you are unsure what actually happened.

    Solution:
    1. The first common reason is that you do not have TPM 2.0 hardware.

      Open Settings Update & Security > Windows Security > Device Security
      – If you do not see a Security processor section on this screen your PC may have a TPM that is disabled.
      – If you do see a Security processor section on this screen then click Security processor details, and verify that your TPM Specification sub-version is 2.0.
      If it is less than 2.0, your device does not meet the Windows 11 requirements.

      Trusted Platform Module (TPM) is an international standard for a secure cryptoprocessor, a dedicated microcontroller designed to secure hardware through integrated cryptographic keys. The term can also refer to a chip conforming to the standard.

      Trusted Platform Module provides
      – A hardware random number generator,
      – Facilities for the secure generation of cryptographic keys for limited uses.

      Usually you can enable or disable TPM in the BIOS of your laptop.
      If you have TPM 1.2, you can often update it to 2.0 by following the guide of your laptop providers. For example if you have a Dell laptop then you can check the guide here.

      If you get “The TPM is Owned.” issue when updating TPM 1.2 to 2.0 then you can check a guide here. (Press F12 after your laptop is reboot.)

    2. The second common reason is that your laptop processor has not been supported by Windows 11.

      Open Settings > System > (scroll down if needed) >  About.
      Search for processor name, e.g. i7-10610U.
      You should find your processor name here if it is supported. For example the Xeon E3-1505M processor has not been supported.

    3. You can also download PC Health Check app to verify these 2 issues or identify other potential issues.

    4. If you plan to install a fresh Windows 11 from an USB then you can ignore the processor support requirement.


    How to Allow a Remote Desktop User to Access CD/DVD

    Problem:

    You log in a computer remotely as an administrator.
    However you cannot read or write any removable storage devices such as CD/DVD or USB flash memory drives.

    Solution:
    1. Type gpedit.msc in the Search box, press Enter.
    2. Go to Local Computer Policy > Computer Configuration > Administrative Templates > System > Removable Storage Access.
    3. Double-click All Removable Storage: Allow direct access in remote sessions.
    4. Click Enabled.
    5. Click OK.


    How to Backup and Restore an EC2 Instance

    Motivation:

    Any changes related to an operating system or an application in an EC2 instance may break its connection. You may try to stop, start, or reboot the instance many times but the problem may still persist. In this case, you may need to restore the instance to a previous stable version.

    Viruses, malwares or accidental deletion of data may also require a restore of an instance to a previous stable version.

    In order to restore an EC2 instance to a previous version you first need to create its backups either manually or automatically.

    Manually backup an EC2 instance:
    1. Click Volumes on the left menu.
    2. Click a volume, click Actions, click Create Snapshot.
    Manually restore an EC2 instance:
    1. Click Snapshots on the left menu, click a snapshot of an instance.
    2. Click Actions, click Create Volume.
    3. Let all default settings intact, click Create Volume.
    4. Repeat the first 3 steps for all the snapshots of the instance.
    5. Stop the instance.
    6. Click the instance, click Storage, scroll down and click on the link of /dev/sda1 device.
    7. Click Actions, click Detach Volume (or Force Detach Volume if the Detach Volume function does not work).
    8. Click Volumes on the left menu.
    9. Click on the volume created from the snapshot.
    10. Click Actions, click Attach Volume.
    11. Select the instance, set Device = /dev/sda1, click Attach.

    12. Detach and attach the remaining volume to the instance.
    13. Start the instance.

    Automate backup process for an EC2 instance:
    1. Go to AWS Backup service.
    2. Click Backup plans on the left menu.
    3. Click the Create Backup plan button, select a template (e.g. Daily-35day-Retention), enter a backup plan name (e.g. HuyBien_Backup_Plan).

    4. Click Backup plans on the left menu, click on a backup plan name.
    5. Scroll down to the Resource assignments section, click the Assign resources button.
    6. Enter a resource assignment name (e.g. HuyBien_Instances or HuyBien_Volumes), the scroll down to the Assign resources section.
    7. Select Resource ID for Assign by.

    8. Select appropriate resources. When you select an EC2 instance, AWS Backup will create backup for all EBS volumes attached to the instance, and then will attach them to an AMI that stores all parameters from the original EC2 instance.
    9. Click the Assign resources button.
    10. Wait for 1 day, then click on the Backup vaults link on the left menu, click a Backup vault name, scroll down to the Backup section to check for backups of the resources created by the backup plan execution.

    Configure backup process time:
    1. Go to https://www.thetimezoneconverter.com/, and convert your time to UTC, for example 1:00 AM Saint Petersburg = 10:00 PM UTC.
    2. Go to AWS Backup, click Backup plans, click on a plan name.
    3. Scroll down to Backup rules, select a rule, click the Edit button.
    4. Scroll down to Backup window, click Customize backup window and enter your times.


    How to Install Ubuntu and Windows as a Dual Boot

    Motivation:

    You are want to install Windows 10 and Ubuntu 18.04 (or Windows 11 and Ubuntu 22.04) as dual boot for completing some machine learning tasks.

    Prerequisites:

    You need to have a 8Gb USB stick.

    Solution:

    Step 1:

    • Note: You can skip this step if you are installing Windows 11 and Ubuntu 22.04.
    • Go to BIOS, select the UEFI option in Boot List Option.
    • Disable the Enable Legacy option ROMS option.
    • Disable Secure Boot.

    Step 2:

    • Install Windows 10 or Windows 11.
    • Create a free partition for Ubuntu.

    Step 3:

    Step 4: Install Ubuntu.

    • Select Minimal installation option, Download updates while installing Ubuntu option on Updates and other software screen.
    • Select Install third-party software for graphics and Wi-Fi hardware option and enter a password on Updates and other software screen. This password will be used on first boot after install.
    • Select Something else on Installation type screen.
    • Select free space partition that you created for Ubuntu.
    • Click the + sign.

    • Create an EFI System Partition and set its size to be 552MB if it does not exist.
    • Create a swap area. Set its size to be twice as your RAM size, e.g. 65536Mb swap area for 32Gb RAM.
    • Create a Root partition. Set its size to be all the remaining free space to optimize your space.

    • Click Install Now button.
    • On first boot after install, select Enroll MOK.
    • Enter the password that you entered to install third party drivers.


    How to Remove Caches and Temporary Files in Windows

    Motivation:

    You may want to remove caches to update an application status or fix some issues.
    You may need to remove temporary files to get some more free disk space.

    Solution:

    Try clearing files and folders in the directories below.

    • %USERPROFILE%\AppData\Local\Temp
    • C:\Windows\Temp
    • C:\Users\All Users\Package Cache
    • C:\Windows\SoftwareDistribution\Download
    • C:\Windows\Microsoft.NET\Framework\v4.0.30319\Temporary ASP.NET Files

    Sometimes you may get permission error when deleting files or folders. If this is true then try the following command before deleting these files and folders.

    takeown /f C:\Users\All Users\Package Cache /r /d y
    icacls C:\Users\All Users\Package Cache /grant administrators:F /t

    How to Hide Your IP Location using VPN in Windows 10

    Motivation:

    You have VPN credentials and want to hide your IP location for a specific purpose.

    Solution:

    • Setup a VPN connection using your VPN credentials.
    • Type and click View network connections in Search box to open the Network Connections window.
    • Right-click the VPN connection and select Properties in the menu.
    • Select the Networking tab.
    • Click the Internet Protocol Version 4 (TCP/IPv4) row, then click the Properties button.
    • Click the Advanced… button.
    • Select Use default gateway on remote network option.

    How to Fix “The parameter is incorrect” Issue When Disabling the Sync Host OneSyncSvc Service

    Problem:

    The Sync Host OneSyncSvc service was not started correctly and caused error in the Server Manager.

    You wanted to disable this service. However you got the “The parameter is incorrect” error message when disabling it.

    Solution:
    1. Click on the Search icon, type regedit, press Enter.
    2. Locate the key below
    Computer\HKEY_LOCAL_MACHINE\SYSTEM\CurrentControlSet\Services\OneSyncSvc

    3.  Change the Start value from 2 to 4 (Disabled).

    4. Restart the server.


    How to Fix the “We can’t sign into your account” Issue in Windows

    Problem:

    You remotely connect o a computer using a Windows Domain account and get the error message below.

    We can't sign into your account
    Solution:
    1. Login the computer as a Local Administrator.
    2. Open C:\Users and delete the folder of the Windows Domain account.
    3. Click Search icon, enter regedit, and press Enter.
    4. Navigate to the path below.
    HKEY_LOCAL_MACHINE\SOFTWARE\Microsoft\Windows NT\CurrentVersion\ProfileList

    4. Look for the Profile of the Windows Domain account by reviewing the ProfileImagePath value.

    5. Delete the Profile key of the Windows Domain account.

    6. Restart the machine.

    How to Run Docker on a Windows 10 Hyper-V Virtual Machine

    Motivation:

    You want to have an environment with Docker for development and testing  without interfering your stable machine.

    Context:

    You have enabled Hyper-V, created a virtual machine and install Windows 10 to the virtual machine.
    When installing Docker in the virtual machine, Docker requires that the Nested Virtualization feature must be enabled for the virtual machine.
    You open PowerShell, execute below command in the virtual machine:

    Get-ComputerInfo -property "HyperV*"

    You find that find that the HyperVRequirementVirtualizationFirmwareEnabled feature is not available.

    Procedure:

    1. Download this PowerShell script. The main interesting command in this script is the command below that enables Nested Virtualization for a virtual machine.

    On the host machine execute below command:

    Set-VMProcessor -VMName $vmName -ExposeVirtualizationExtensions $true

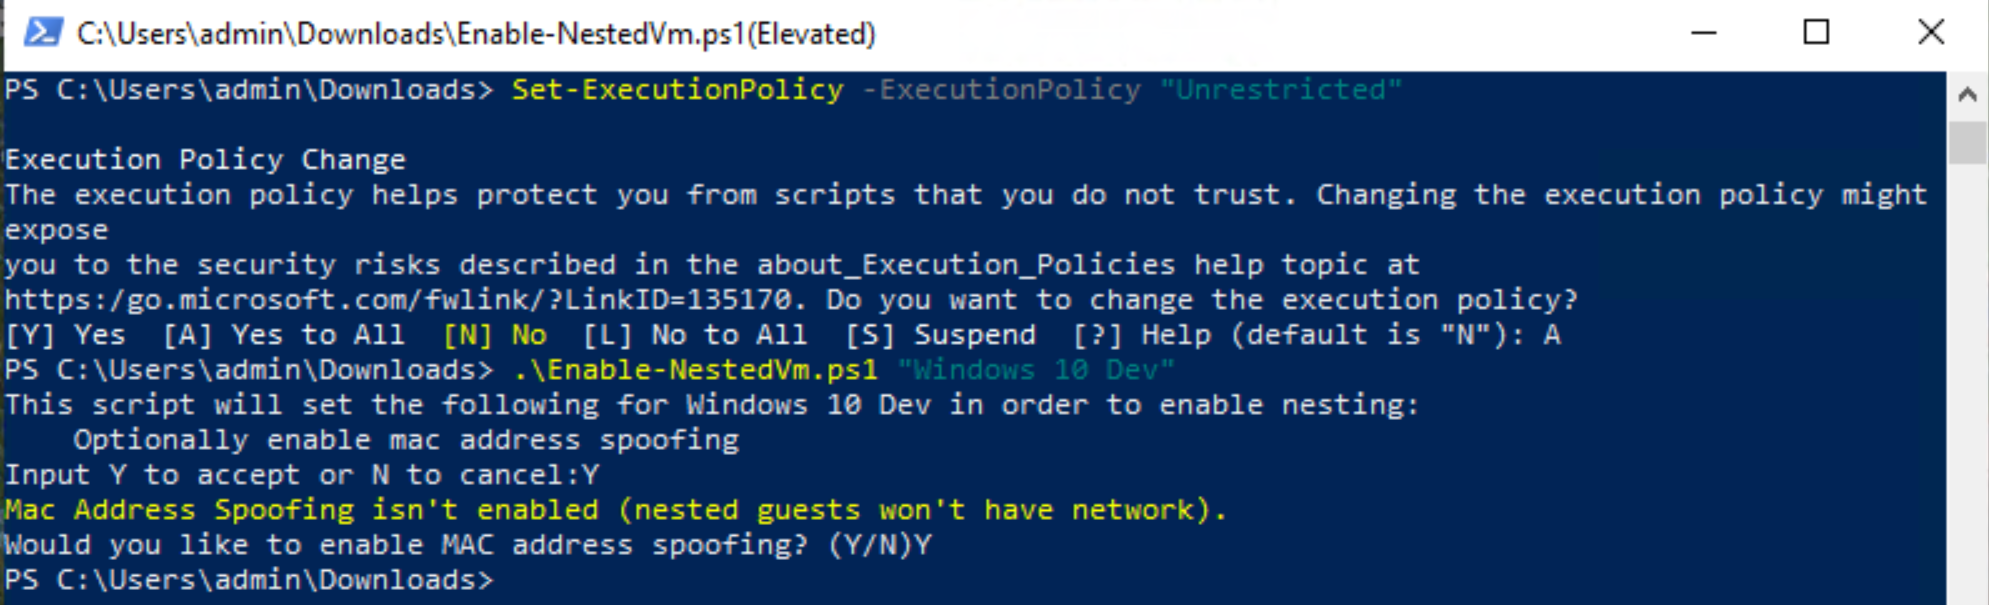
    2. Open PowerShell as Administrator and execute 2 commands below.

    Set-ExecutionPolicy -ExecutionPolicy "Unrestricted"
    .\Enable-NestedVm.ps1 "Windows 10 Dev"
    
    "Windows 10 Dev" is the virtual machine name without quotes.

    3. Install Docker. Restart the virtual machine.

    4. Install any additional software if needed, restart the virtual machine again.

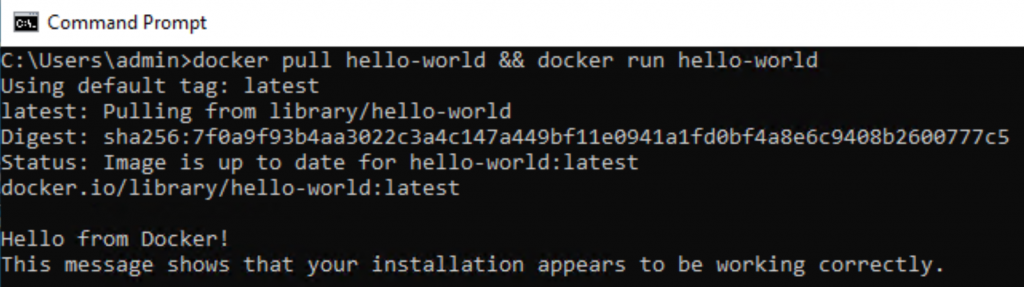
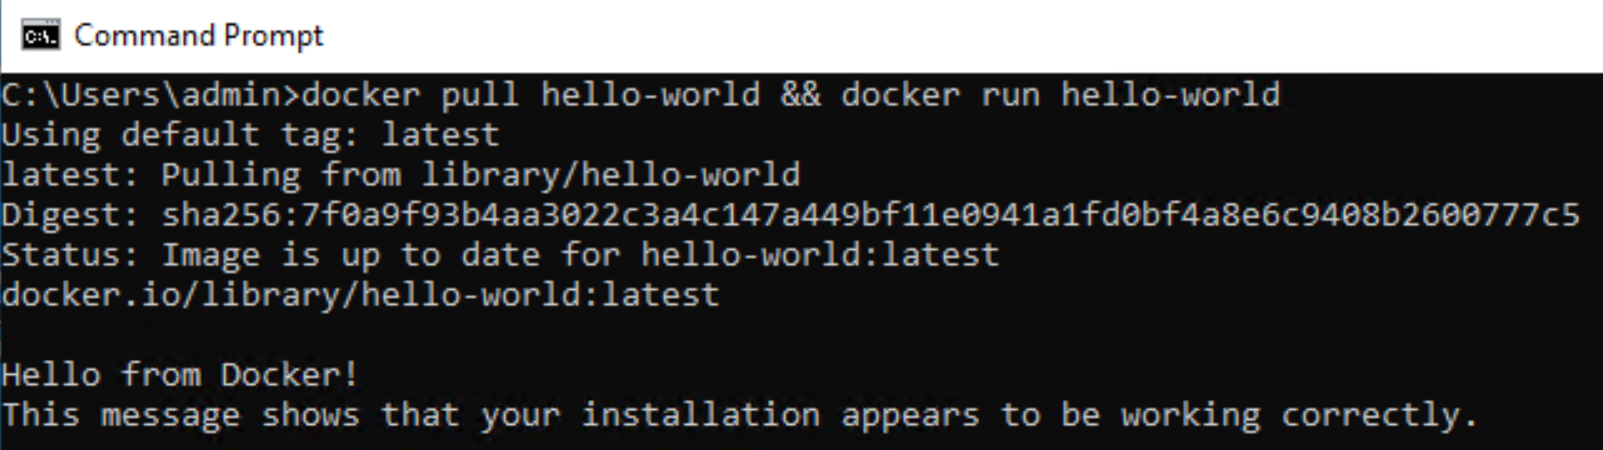
    5. Open a Command Prompt and test Docker installation.

    docker pull hello-world && docker run hello-world
    
    Rerun the command if you get an issue in the first run.